This is the multi-page printable view of this section. Click here to print.

Return to the regular view of this page.

Promoting to AI Team Edition

Switch from the AI Developer Edition to AI Team Edition.

In AI Developer Edition, data requiring encryption is processed through the AI Developer Edition API Service. This is suitable for development and testing but lacks the scalability and centralized management needed for production environments. To meet enterprise requirements such as robust logging, advanced security, and modular feature deployment, promote to AI Team Edition. AI Team Edition uses Protegrity Provisioned Cluster (PPC), a Kubernetes-based framework for scalable, production-ready deployments. Unlike traditional Protegrity setups that rely on Enterprise Security Appliance (ESA), AI Team Edition simplifies architecture by using PPC for collaborative, high-performance environments without the complexity of appliance clusters.

For more information about the AI Team Edition, refer to AI Team Edition documentation.

Ensure that you unprotect the data before porting and reprotect it after the port to AI Team Edition is complete.

Key Advantages of AI Team Edition Over AI Developer Edition

The key differences between AI Developer Edition and AI Team Edition across deployment, features, security, and scalability are outlined here.

Deployment and Architecture

Team Edition is container-based and built on a microservices architecture, enabling fast deployment, simplified operations, and native integration with CI/CD pipelines. This aligns with modern DevOps practices and scales easily across environments.

Developer Edition, by contrast, is primarily API-focused and intended for prototyping and development, not production. It uses a protector model and cannot go into production environments.

Feature Set

AI Team Edition includes advanced capabilities such as:

  • Data Discovery and Classification for sensitive data (PII, PCI, PHI, IP).
  • Semantic Guardrails to enforce safe AI interactions.
  • On-demand Anonymization and Privacy-Safe Synthetic Data generation.
  • Integrated policy management and governance for compliance.

Developer Edition offers the basic features of these for developers to experiment. It lacks enterprise-grade security and compliance features.

Use Case and Audience

Team Edition is designed for small to mid-sized teams or departmental deployments that need production-ready data protection for AI and analytics workflows. It supports multiple protectors, enabling broader use cases beyond development.

Developer Edition is strictly for initial development and prototyping; it cannot be scaled for production workloads.

Security and Compliance

Team Edition embeds security directly into AI workflows, ensuring compliance without slowing innovation. It uses unique key material per customer, supports External Initialization Vectors (EIV), and enforces policy encryption over TLS.

Developer Edition uses shared key material and mock protectors, making it unsuitable for production-grade security.

Cost and Scalability

Team Edition offers a lower total cost of ownership for departmental deployments and can scale into Enterprise Edition later.

Developer Edition is free for experimentation but has no upgrade path for assets created during development; moving to Team or Enterprise requires reconfiguration.

Note: Ensure that the version number of components on Protegrity AI Team Edition is at least the same or higher than the version number on Protegrity AI Developer Edition.
1 - Preparing for AI Team Edition

Understanding and preparing to move to AI Team Edition.

Moving from AI Developer Edition to AI Team Edition represents a significant step in scaling your AI development capabilities. AI Team Edition provides enhanced collaboration features, centralized management, and enterprise-grade controls designed for teams working together on AI-powered applications.

This guide walks you through the essential preparation steps to ensure a smooth transition from AI Developer Edition to AI Team Edition.

Understanding the process

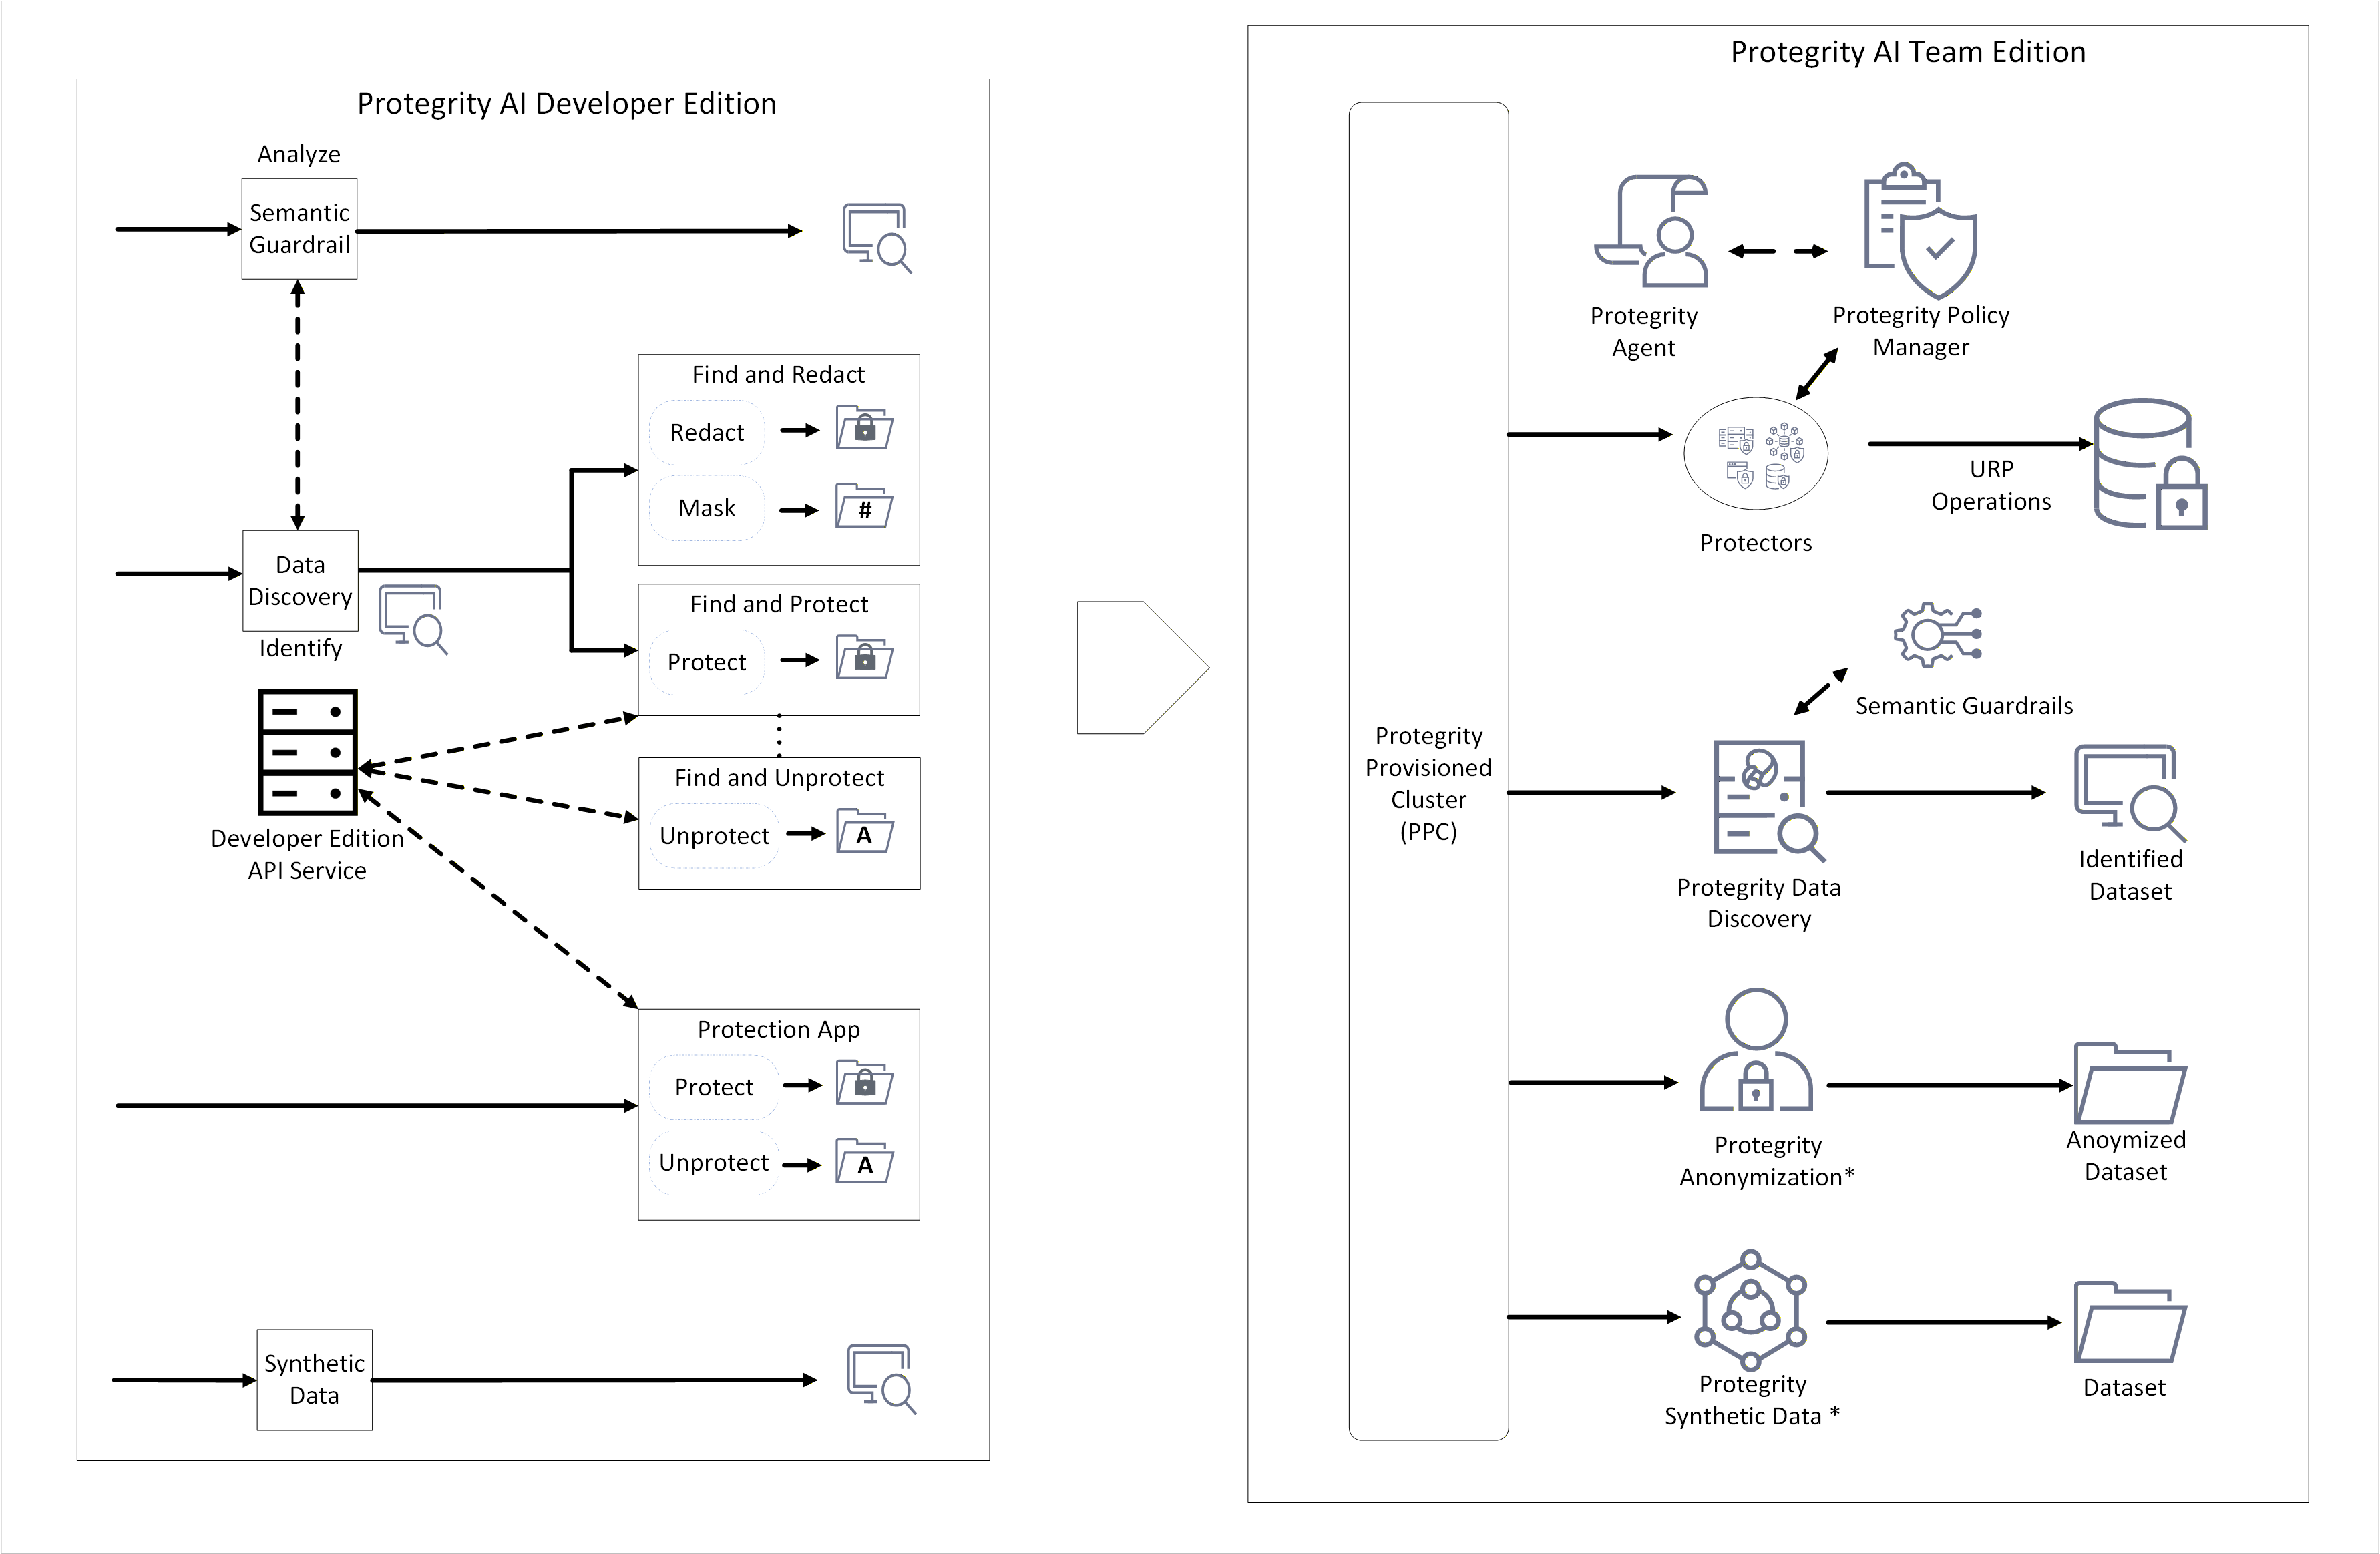
Moving to the AI Team Edition involves updating the configuration of the AI Developer Edition artifacts to use the AI Team Edition features. The following image shows the features in the editions.

* - Anonymization and Synthetic Data are available for purchase as an add-on. Can be installed as an individual product.

An overview of the process is provided here:

  1. Install the Protegrity Provisioned Cluster (PPC) and the required AI Team Edition features.
  2. Update the endpoints for Data Discovery, Semantic Guardrails, and Synthetic Data to point to the PPC.
  3. Install the AI Team Edition Application Protector Python modules and Application Protector Java libraries.

Note: Data protected in AI Developer Edition cannot be unprotected with the policy in AI Team Edition. Ensure that you unprotect the data before porting and reprotect it after the port to AI Team Edition is complete.

Feature version

Ensure the AI Team Edition component versions are equal to or higher than the versions listed below. The version number of the AI Developer Edition features are as follows.

Product nameAI Developer Edition
Developer Edition API ServiceNot applicable
Data Discovery2.0.0
Semantic Guardrails1.1.1
Synthetic Data2.0.0
Anonymization2.0.0
Python SDK1.2.1
Java SDK1.1.0

Installing the AI Team Edition

Install the AI Team Edition using the steps from the AI Team Edition documentation.

2 - Updating Data Discovery

Use the AI Team Edition endpoint for Data Discovery.

The applications and code use the AI Developer Edition features. Update the endpoints to direct the applications and code to use the AI Team Edition features.

The Data Discovery classification API uses the following endpoint:

http://localhost:${CLASSIFICATION_PORT:-8580}/pty/data-discovery/v2/classify

Update and use the AI Team Edition endpoint for plain text unstructured data:

https://{Host Address}/pty/data-discovery/v2/classify/text

Use the following endpoint for structured tabular data:

https://{Host Address}/pty/data-discovery/v2/classify/tabular

Where, {Host Address} is the hostname of the PPC.

For more information about the APIs, refer to the Data Discovery Classify API documentation.

3 - Updating Semantic Guardrails

Use the AI Team Edition endpoints for Semantic Guardrails.

The applications and code use the AI Developer Edition features. Update the endpoints to direct the applications and code to use the AI Team Edition features.

Semantic Guardrails API uses the following endpoint:

http://localhost:${SGR_PORT:-8581}/pty/semantic-guardrail/v1.1/conversations/messages/scan

Update and use the AI Team Edition endpoint:

https://{Host Address}/pty/semantic-guardrail/v1.1/conversations/messages/scan

Where, {Host Address} is the hostname of the PPC.

Note: Ensure that the configuration for Data Discovery are updated. For more information, refer to Updating Data Discovery.

4 - Updating Python Modules

Steps for updating the Python modules.

This document provides guidance on migrating from the Protegrity AI Developer Edition to the Protegrity AI Team Edition (Cloud Protectors) using the Python SDK.

Prerequisites

  • Install and set up the Protegrity Provisioned Cluster (PPC) and AI Team Edition using the steps from the PPC documentation and the respective feature documentation.
  • Install and set up a compatible Cloud Protector for Protegrity AI Team Edition.

Move to Protegrity AI Team Edition using one of the following approaches:

Scenario 1: Using the CLI Tool

Protegrity AI Developer Edition version 1.2.0 includes a CLI to make the Protegrity AI Developer Edition (DE) → Protegrity AI Team Edition (TE) transition mechanical rather than manual. Install the Python package and use the CLI tool to verify the migration and to create the required policies on PPC.

  1. Set Team Edition environment variables for the SDK on the application host:

    export PTY_CP_HOST=<your-cloud-protect-invoke-url>
    export PTY_AUTH_MODE=aws_iam        # or cognito, bearer_token, mtls, none
    
  2. Set PPC credentials. This is used by both check and create-policy:

    export PTY_PPC_HOST=<your-ppc-host>
    export PTY_PPC_PASSWORD=<admin-password>
    

    Both commands also accept --ppc-host <host> and --ppc-password <password> flags if you prefer to pass them explicitly per invocation. Environment variables are recommended to keep credentials out of shell history.

    As an alternative, every pty-migrate and SDK setting can also reside in ~/.protegrity/config.yaml. The resolution order: CLI flag > env var > YAML file > default. Storing passwords in the file requires allow_secrets_in_file: true AND chmod 600 on the file. This is the same model as ~/.pgpass. For the full key list, refer to config.yaml.template in the protegrity-ai-developer-python package.

  3. Run a readiness check to view any missing requirements:

    pty-migrate check
    

    By default, this verifies only the data elements and users present in the local usage stats. Add --full to verify the entire bundled Protegrity AI Developer Edition policy instead.

    The output lists each item, such as the SDK version, endpoint reachability, PPC data elements, datastore export key, and role members, with or and a concrete remediation command for anything missing.

  4. Deploy the policy to PPC. This is only needed the first time, or after a PPC reset:

    pty-migrate create-policy
    

    By default, the CLI deploys only the data elements that usage stats show are used. Add --full to deploy the complete bundled Developer Edition policy. This is recommended for QA, training, or demo environments that should mirror Protegrity AI Developer Edition.

  5. Register the datastore export key so the Policy Agent can sync the policy to Cloud Protect. The exact curl command with the right datastore id is printed at the end of create-policy. Supply the KMS public key (PEM); the fingerprint returned must match PTY_DATASTORE_KEY on the Policy Agent Lambda.

  6. Trigger the Policy Agent Lambda or wait for its hourly schedule to push the policy from PPC to Cloud Protect.

  7. Re-run pty-migrate check. If required, add --full if earlier deployed with --full. When every line shows , the application’s existing sample-app-protection.py / sample-app-protection.sh commands will work unchanged against Protegrity AI Team Edition with the same policy_user and same data_element names.

Note: The same data elements, role names, and policy users you used in Protegrity AI Developer Edition, such as superuser, admin, name, address, text, ccn, and so on, are preserved on Protegrity AI Team Edition by create-policy. No application code changes are required to switch environments.

Configuration Reference

All settings can be supplied using environment variables, a YAML file at ~/.protegrity/config.yaml (override path with PTY_CONFIG_FILE), or built-in defaults - resolved in that order. A starter template is available at config.yaml.template in the protegrity-ai-developer-python package.

# ~/.protegrity/config.yaml - keys mirror the PTY_* env vars but lowercased
protect_host: https://cp.example.com/pty
auth_mode: bearer_token
request_timeout: 30
max_retries: 3
# static_token: eyJhbGciOi...   # see security note below

Note: Secret keys, such as static_token and client_secret are loaded from the YAML file. This is only if the file is chmod 600, that is, owner read/write only the same rule ssh and ~/.pgpass enforce. If the file is group-readable or world-readable, secret keys are dropped at load time and a warning is printed to stderr; non-secret keys still load normally. On Windows, the POSIX permission check is skipped.

Environment variablePurposeDefault
PTY_CP_HOSTCloud Protect endpoint URL (Protegrity AI Team Edition).none
PTY_AUTH_MODEForce a specific auth mode: cognito, aws_iam, bearer_token, mtls, none.auto-detect
PTY_API_VERSIONCloud Protect API version segment.1
PTY_REQUEST_TIMEOUTPer-request HTTP timeout in seconds.30
PTY_MAX_RETRIESRetries on transient failures (HTTP 429, 5xx, connection errors) with exponential backoff. 0 disables.3
PTY_STATIC_TOKENBearer token for bearer_token mode.none
PTY_TOKEN_ENDPOINT, PTY_CLIENT_ID, PTY_CLIENT_SECRETOAuth2 client-credentials token fetch for bearer_token mode.none
PTY_CLIENT_CERT, PTY_CLIENT_KEY, PTY_CA_CERTmTLS material.none
PTY_CONFIG_FILEOverride the YAML config location.~/.protegrity/config.yaml
DEV_EDITION_EMAIL, DEV_EDITION_PASSWORD, DEV_EDITION_API_KEYProtegrity AI Developer Edition credentials, selects cognito mode.none

Usage Statistics

appython writes anonymous local counters, such as operation type, data element, and day, to ~/.protegrity/stats.json after every protect/unprotect/reprotect call. The file never leaves your machine and contains no payloads or credentials. Disable with PTY_DISABLE_USAGE_STATS=1.

Note: PTY_PROTECT_HOST from earlier 1.2.0 pre-releases was renamed to PTY_CP_HOST to avoid confusion with PTY_PPC_* (Policy Console) variables. Update any scripts before upgrading.

The pty-migrate CLI

Installed automatically with the package.

Run the following three subcommands to help you create the required policies and migrate:

pty-migrate check          # Pre-flight readiness validation
pty-migrate create-policy  # Create the equivalent DE policy on your PPC
pty-migrate stats          # View local usage statistics
  • pty-migrate check validates SDK version, PTY_CP_HOST, auth credentials, and (optionally) round-trips a real protect call against your Cloud Protect endpoint. Run it once after exporting your env vars; it prints actionable hints for each missing piece.
  • pty-migrate create-policy talks to your Protegrity Provisioned Cluster (PPC) using PTY_PPC_HOST, PTY_PPC_USER, PTY_PPC_PASSWORD, and PTY_WORKBENCH_PASSWORD, then creates a TE policy whose data elements match the ones DE provided out of the box (ccn, ssn, name, email, …). It is safe to re-run this command.
  • pty-migrate stats prints a per-data-element, per-day breakdown so you can size your TE deployment based on real DE usage.

Note: Storing PPC passwords in the YAML file is supported but off by default. To opt in, add allow_secrets_in_file: true to ~/.protegrity/config.yaml and chmod 600 the file; only then will ppc_password and workbench_password be read from it. Without both, pty-migrate ignores those keys and prints a remediation hint - the same model as ~/.pgpass and ~/.npmrc. CLI flags (--ppc-password) and env vars (PTY_PPC_PASSWORD) always take precedence and need no opt-in.

Scenario 2: Using the AP Python module of AI Team Edition

Note: When the policy is set up on the AI Team Edition, ensure that the same data elements added for the AI Developer Edition are used. For more information about the data elements policy, refer to Policy Definition.
If you use different data elements while creating the policy, then modify the data elements used in the AI Developer Edition accordingly before running the modules.

  1. Select the venv where protegrity-ai-developer-python is installed.

  2. Install Application Protector Python using the steps from the Application Protector Python documentation.

    Note:
    When prompted for the ESA IP address, enter the hostname of the PPC. Similarly, when prompted for the ESA listening port number, enter 25400. This enables the protector to integrate with the PPC.
    After installation, the AP Python module of AI Developer Edition is replaced with the AP Python module of AI Team Edition.

  3. Run the samples.

5 - Updating Java Libraries

Steps for updating the Java libraries.

This document provides guidance on migrating from the Protegrity AI Developer Edition to the Protegrity AI Team Edition (Cloud Protectors) using the Java SDK.

Prerequisites

  • Install and set up the Protegrity Provisioned Cluster (PPC) and AI Team Edition using the steps from the PPC documentation and the respective feature documentation.
  • Install and set up a compatible Cloud Protector for Protegrity AI Team Edition.

Move to Protegrity AI Team Edition using one of the following approaches:

Scenario 1: Using the CLI Tool

Protegrity AI Developer Edition version 1.2.0 includes a CLI to make the Protegrity AI Developer Edition (DE) → Protegrity AI Team Edition (TE) transition mechanical rather than manual. Install the Python and the Protegrity AI Developer Edition Python package and use the CLI tool to verify the migration and to create the required policies on PPC.

  1. Set Team Edition environment variables for the SDK on the application host:

    export PTY_CP_HOST=<your-cloud-protect-invoke-url>
    export PTY_AUTH_MODE=aws_iam        # or cognito, bearer_token, mtls, none
    
  2. Set PPC credentials. This is used by both check and create-policy:

    export PTY_PPC_HOST=<your-ppc-host>
    export PTY_PPC_PASSWORD=<admin-password>
    

    Both commands also accept --ppc-host <host> and --ppc-password <password> flags if you prefer to pass them explicitly per invocation. Environment variables are recommended to keep credentials out of shell history.

    As an alternative, every pty-migrate and SDK setting can also reside in ~/.protegrity/config.yaml. The resolution order: CLI flag > env var > YAML file > default. Storing passwords in the file requires allow_secrets_in_file: true AND chmod 600 on the file. This is the same model as ~/.pgpass. For the full key list, refer to config.yaml.template in the protegrity-ai-developer-python package.

  3. Run a readiness check to view any missing requirements:

    pty-migrate check
    

    By default, this verifies only the data elements and users present in the local usage stats. Add --full to verify the entire bundled Protegrity AI Developer Edition policy instead.

    The output lists each item, such as the SDK version, endpoint reachability, PPC data elements, datastore export key, and role members, with or and a concrete remediation command for anything missing.

  4. Deploy the policy to PPC. This is only needed the first time, or after a PPC reset:

    pty-migrate create-policy
    

    By default, the CLI deploys only the data elements that usage stats show are used. Add --full to deploy the complete bundled Developer Edition policy. This is recommended for QA, training, or demo environments that should mirror Protegrity AI Developer Edition.

  5. Register the datastore export key so the Policy Agent can sync the policy to Cloud Protect. The exact curl command with the right datastore id is printed at the end of create-policy. Supply the KMS public key (PEM); the fingerprint returned must match PTY_DATASTORE_KEY on the Policy Agent Lambda.

  6. Trigger the Policy Agent Lambda or wait for its hourly schedule to push the policy from PPC to Cloud Protect.

  7. Re-run pty-migrate check. If required, add --full if earlier deployed with --full. When every line shows , the application’s existing sample-app-protection.py / sample-app-protection.sh commands will work unchanged against Protegrity AI Team Edition with the same policy_user and same data_element names.

Note: The same data elements, role names, and policy users you used in Protegrity AI Developer Edition, such as superuser, admin, name, address, text, ccn, and so on, are preserved on Protegrity AI Team Edition by create-policy. No application code changes are required to switch environments.

The pty-migrate CLI

Installed automatically with the package.

Run the following three subcommands to help you create the required policies and migrate:

pty-migrate check          # Pre-flight readiness validation
pty-migrate create-policy  # Create the equivalent DE policy on your PPC
pty-migrate stats          # View local usage statistics
  • pty-migrate check validates SDK version, PTY_CP_HOST, auth credentials, and (optionally) round-trips a real protect call against your Cloud Protect endpoint. Run it once after exporting your env vars; it prints actionable hints for each missing piece.
  • pty-migrate create-policy talks to your Protegrity Provisioned Cluster (PPC) using PTY_PPC_HOST, PTY_PPC_USER, PTY_PPC_PASSWORD, and PTY_WORKBENCH_PASSWORD, then creates a TE policy whose data elements match the ones DE provided out of the box (ccn, ssn, name, email, …). It is safe to re-run this command.
  • pty-migrate stats prints a per-data-element, per-day breakdown so you can size your TE deployment based on real DE usage.

Note: Storing PPC passwords in the YAML file is supported but off by default. To opt in, add allow_secrets_in_file: true to ~/.protegrity/config.yaml and chmod 600 the file; only then will ppc_password and workbench_password be read from it. Without both, pty-migrate ignores those keys and prints a remediation hint - the same model as ~/.pgpass and ~/.npmrc. CLI flags (--ppc-password) and env vars (PTY_PPC_PASSWORD) always take precedence and need no opt-in.

Scenario 2: Using the AP Java module of AI Team Edition

Note: When the policy is set up on the AI Team Edition, ensure that the same data elements added for the AI Developer Edition are used. For more information about the data elements policy, refer to Policy Definition.
If you use different data elements while creating the policy, then modify the data elements used in the AI Developer Edition accordingly before running the modules.

  1. Install Application Protector Java libraries using the steps from the Application Protector Java documentation.

    Note: When prompted for the ESA IP address, enter the hostname of the PPC. Similarly, when prompted for the ESA listening port number, enter 25400. This enables the protector to integrate with the PPC.

  2. Include the ApplicationProtectorJava.jar in the classpath of your applications.

  3. Navigate to the location where the AI Developer Edition is cloned.

  4. Go to the protegrity-ai-developer-edition/samples/java directory.

    a. Update the pom.xml and the application-protector-java dependency.

    ```
    <dependency>
        <groupId>com.protegrity</groupId>
        <artifactId>application-protector-java</artifactId>
        <version>1.1.0</version>
        <scope>system</scope>
        <systemPath>/opt/protegrity/sdk/java/lib/ApplicationProtectorJava.jar</systemPath>
    </dependency>
    ```
    

    Note: The AP Java libraries are expected to be in the default path /opt/protegrity/sdk/java/lib/. If the installation uses a different directory, update the environment or configuration so the system can locate the correct JAR files.

    b. Run the following command.

    ```
    ./mvnw clean package
    ```
    

    c. Update the sample shell script to include ApplicationProtectorJava.jar in the classpath.

    d. Run the samples.